Highlighting Some SSH Features
2021-12-31
security
software
SSH - the secure shell - is a client/server software that lets a user log in securely log in to a remote UNIX server and "get a shell" to get some work done there. It has many features, some of which can come quite handy. Let me present some interesting use cases - from simple to more advanced ones.
Note: this is not a step-by-step guide. More like inspiration: should you be interested in something that's mentioned here, I urge you to explore the details using man pages and other documentation.
When you log in to a server using SSH, what you really have is a channel between your client and the server. This channel is:
- authenticated: meaning both the server and the client can be pretty sure who the other side is
- encrypted: meaning observers of the client-server traffic don't know what it's all about
- integrity protected: meaning an attacker cannot modify the communication without being detected
Normally this is used to get some work done on the server in a terminal, but as these articles show you there are quite a number of other uses as well.
Some Basics
Step 0
From now on I'll assume you have access to some server via SSH, and perhaps you're even administering that machine. I'll not go into full details on how to begin this. If you really need help, try googling for this which will give you pages like this one.
Keys And Passphrases
First of all, you really should be using public/private keys to do this instead of account passwords. If you care about your keys enough (see below) then this is likely to be much safer than using passwords.
So your'e using some private/public key pair to log in. However, I strongly recommend that while you're doing this, the (private) key on your client is passphrase protected, meaning you have to type in the passphrase that unlocks the key when you actually want to use it. If you don't have this already then I recommend you do it now. If you're using ssh-agent (which is something that's likely already on your client, you don't necessarily have to do anything really) then you only need to supply the passphrase the first time you use this key to "unlock" it; ssh-agent will remember this until you tell it otherwise (or reboot). So this is not really a burden. But it does help a lot in case your files are somehow stolen (backed up to the wrong place, exposed somehow, ...)
Multiple Keys And Backup Access
It's useful to know that the ~/.ssh/authorized_keys file can contain multiple keys that are in general all equal, so for example all are authorised to log in the same way. The first match between the keys your client offers, and the ones that can be found in this file, will be accepted.
This is cool because it lets you define a "secondary access key", for example one that resides on a different computer of yours, that you can use to log in in case you lose the primary one. For example if your primary laptop with your favourite SSH key is stolen or the disk breaks or such, you can still log in to your server(s) using your backup key, and keep working. In such a case you probably should immediately add yet another key, and perhaps remove the original stolen/lost one.
Make sure your secondary key has the same protection as your primary (i.e. it also has a passphrase, preferably a different one), and exercise using it every now and then.
Agent Forwarding
Suppose you logged in to a server using a key of yours. Now, from that server you want to further log on to a next one. But you don't have keys on your first server, you only have them on your client. What you can do here is called "agent forwarding": you can tell SSH that, in case you want to make the second step, it should reuse your key from your client. You tell this to your ssh client with the -A flag, so like:
ssh -A server1
Of course in this case the second server (and the third, ... in the chain) needs to have your original public key set up for access. But then this lets you get away without having keys of any kind installed on your server. Which is cool in a number of ways, the most important probably being that nobody can steal those (since they don't exist...)
However, there's this piece in the SSH documentation:
Agent forwarding should be enabled with caution. Users with the ability to bypass file permissions on the remote host (for the agent's UNIX-domain socket) can access the local agent through the forwarded connection. An attacker cannot obtain key material from the agent, however they can perform operations on the keys that enable them to authenticate using the identities loaded into the agent.
This basically means: only do this if you're the only user on your server, or if you sufficiently trust the administrators on that server that they will not abuse their power. In other words: don't do this on a shared server you got access to from random "friends".
Jump Server, ProxyJump Directive
The above method of doing client-server1-server2 login chains is actually quite common in infosec circles. It allows server2 to only listen to SSH connections coming from server1, not the whole Internet. In most cases server1 (which from now on we can call a jump server) does not run any other services but SSH and it is otherwise hardened, closely monitored, etc. The point is that with this setup the attack surface on server2 or any other servers following the same access patterns has a much smaller attack surface.
To make things smooth, you can have a snippet like this in your ~/.ssh/config file:
Server server2
  ProxyJump server1
And then you can simply do ssh server2 to seamlessly "jump through" server1.
Filtering Which Machines Can Connect To A Server
It is possible to restrict which machines can or cannot connect to your SSH server. You can do this on a per key basis by tweaking the lines in your .ssh/authorized_keys file like so:
from="*.sales.example.net,!pc.sales.example.net" ssh-rsa AAAAB2...19Q== john@example.net
The pattern in the from part can have IP addresses, names, IP ranges and others; look up the details in you sshd documentation.
Run Your SSH Server On A Non-Default Port
There are a lot of bad actors out there. When you set up a new server on the Internet with an SSH server on it, chances are it will be probed (i.e. attackers will try to gain access to it) within seconds, perhaps minutes. These probings will basically never stop. The picture is slightly different if you're only running IPv6 - but if you're doing that then I'll probably not teach you anything new here and now so I'll just ignore this for now :-)
What you can do against this is to run your SSH server on a different port, not on 22 as it is the normal case. You can pick almost any port you want, but for practical reasons it's best to pick something between 1025 and 30000. (We can argue for a long time about what the minimum/maximum port number can precisely be here, and it depends on a number of factors. It's not important now.) What you do is change the port number in your server configuration, most likely in /etc/sshd/sshd_config and restart the SSH daemon on your server.
Of course this is not a perfect solution, your new non-default port SSH daemon can and will be found with port scanning. But I guarantee you, much fewer attackers do that vs. who blindly hammer your default port.
Note this only works well if your ISP or other network provider does not prevent outgoing network connections to seemingly random ports. They should not do this - but it's useful to check first before you declare victory about this!
More Elaborate Uses
Command Restrictions
Secure "shell" does not necessarily mean shell access on the server. For each key that is otherwise allowed access, one can specify a command - i.e. some executable on the servers, with parameters if you want - that will be executed when this "key" logs in, instead of a shell. This is a strict restriction: the client that authenticates cannot choose to do this or not; it is enforced by the server; hence the name ForceCommand. This opens up a lot of possibilities... just to give you some ideas:
- It can extract some information form the server, send it back to the client, and disconnect. For example retrieve a backup or get some server status information
- It can just trigger some action (restart a service or kick a process... you name it)
- It can enable a service that is otherwise disabled (for example let a different user log in in the next X seconds...)
The syntax (in ~/.ssh/authorized_keys) is relatively simple:
command="/bin/echo Hello there" ssh-rsa AAAA....contents-of-that-key.pub
Trying this out yields:
$ ssh -i ~/.ssh/that-key server
Hello there
The command feature can be combined with other restrictions such as disabling port forwarding or pseudo-terminals and such to lock the connection down even more. This can come quite handy.
To expand on an example I mentioned above: in order to use this to securely retriece backups (which themselves may be encrypted), you can have an entry like:
restrict,command="/bin/cat /path/to/my/latest/backup" ssh-rsa AAAA....some-key-material-here
Which will ignore whatever else you wanted from the server and instead dump the latest backup back on the SSH channel.
Local Port Forwarding
A "local port forwarding" basically means: whenever there is a TCP connection on the client machine to port X, make that pop out on the server instead on port Y. One quite handy use of this is to set up a tunnel that lets you connect to services on your server on the server side that are only available on localhost. For example, you can run a local web server that has statistics or local services, or an administration interface to your wordpress site - and make this available to your client only if the SSH connection is up. As a practical example, let's assume you run a web server (e.g. the administration site of your blog or such) on your server on localhost:8080. If you now log in to your server like:
ssh -L 8888:localhost:8080 server
Now you can connect, in your client, a browser to http://localhost:8888/ and you'l end up connecting to your hidden web server. Note this does not need to be a HTTPS connection; SSH will take care of the privacy of the communication channel from a local port on your client to a local port on your server so the contents are never actually visible to an observer. This also saves you from getting a TLS (HTTPS) certificate for your admin site!
Also note that the this tunnel via port forwarding is protocol independent (since it works on the TCP level) which is why it could forward HTTP or HTTPS as well. In a later example we'll see it forwarding even SSH - in an SSH tunnel.
Remote Port Forwarding
"Remote port forwarding" is the opposite of local port forwarding: whenever there's a connection on the server side to the port specified in your SSH connection, it'll end up on your client on a port specified by you. This means that, while you are connected using a command like this:
ssh -R 8080:localhost:8888
... you're also providing service on the server on (localhost) port 8080, in reality serviced on port 8888 of your client machine.
On the surface this seems to be impractical. However, it is possible to listen on a port on the server on an IP other than localhost so the service can be available to the world. Later on I'll also use this feature for two more real-life examples.
Dynamic Port Forwarding
Dynamic port forwarding is a somewhat different feature. It allows you to run a SOCKS proxy on your client. That is, if you use SSH like:
ssh -D8888 server
... and configure your browser on your client to enable SOCKS5 for HTTP connections (somewhere in settings -> proxies, point it to use localhost:8888), then from this point on all HTTP(S) connections from your client will go through the SSH connection. This means that, no matter what URL you browse to, the server will see the client address to be your server's IP, not your client's. In essence this is a "poor man's VPN service": if your server is in a different network then your HTTP connections will seemingly connect from there, not from your client.
Reverse Shells
Let's say you have a small server at home you use as your home fileserver or media server or such ("media-server") and that this is a UNIX/Linux based machine. Furthermore this server, like all other machines in your home, are behind a NAT or a firewall. What if you'd like to connect to it (say, grab a file?) but you're not at home? Because of the NAT or firewall, you can't connect to it directly. Let's also assume you have some public server as well (since you're reading about SSH you're likely to use that somewhere).
The reverse port forwarding feature also helps here, if you prepare a bit in advance. While you're at home, you should connect from your home server to your public server:
ssh -R 2222:localhost:22 public-server
For stability you should try to keep this connection up and resurrect it after a failure; a simple version is:
while [ 1 ]; do
  ssh -NT -R 2222:localhost:22 public-server
  echo Hmm, the SSH connection went down at `date`, re-establishing in a sec
  sleep 5
done
(And run this in a terminal that'll not exit, e.g. in a screen or tmux session. -N and -T are useful though not strictly needed here; check your documentation about what they are.)
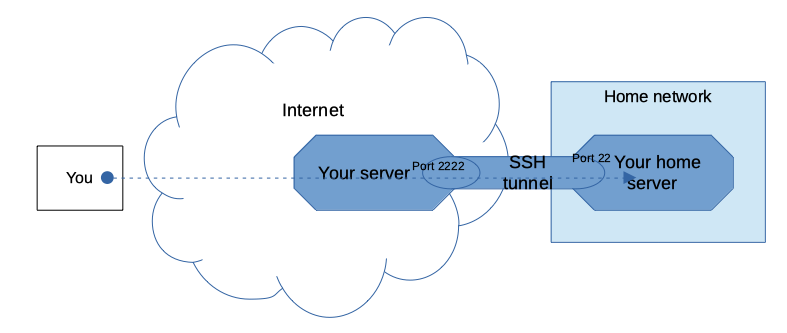
Now we're ready to do what must be done: in order to log on to your home-server while you're on the road, first you connect to your public server, then you make use of the reverse tunnel: connecting to the local port 2222 which, through the tunnel, will take you to port 22 (SSH) of your home server:
ssh -p2222 localhost
Using the above mentioned agent-forwarding and ProxyJump features, you can make this a single SSH command as well.
Keepalive
When you set up an SSH connection between two hosts, chances are there will be a firewall or a NAT in between. Such devices are usually stateful, meaning are aware of what TCP connections are currently active - and the ones that are not seem to be active are usually terminated (e.g. the session is shut down and the hosts on the two hosts get disconnected from each other. This is suboptimal for your long-lived SSH sessions that are otherwise not very active - these will get terminated too.
What you can do is to periodically send some traffic through the SSH connection. Luckily SSH has a built-in feature for this. Use ServerAliveInterval in your ~/.ssh/config (set it to something else than 0, say 25?). The SSH client will then send a "dummy" packet to the server every 25 seconds and expect an answer. These packets do not interfere with your SSH connection, they are practically invisible.
A related setting is ServerAliveCountMax - this lets you control how many times the keep-alive packet can be lost. If it's lost more than this threshold, then the connection will be terminated; so it basically acts as a knob for your "packet loss tolerance".
Multiple AuthorizedKeysFile Entries
It's worth noting that a user can have more than one file where authorized keys are listed. In fact by default it's two files already, .ssh/authorized_keys and .ssh/authorized_keys2 (the naming scheme is not the most creative...) This can be overridden in the sshd configuration on the server side). The keys listed in thee files are tried sequentially, and a match in any of them is accepted.
So what is this good for you may ask...? It lets you separate your keys into multiple files if you want to, for whatever reason. For example your normal keys are listed in one file as usual, whereas the second file is automatically re-generated as a result of some action. This is a safer approach than combining manual entries and automatic ones in a single file; if anything goes wrong you can still log in and fix things, whereas with a single, unified file a programming error (or a hacking attempt?) can have dire consequences.
Advanced Stuff
AuthorizedKeysCommand And Beyond
The above idea of using multiple AuthorizedKeysFiles can be taken one step further. On the server side AuthorizedKeysCommand can be used to generate the list of authorized keys on the fly, that is by a command that outputs such a list on demand instead of them being in a file. It can take parameters from the SSH daemon to filter the keys it outputs. If creating and re-creating your .authorized_keys2 is a burden, you can look into this option instead.
This page suggests that this mechanism is used in GitLab and I suspect GitHub is using something similar to manage SSH access for many millions of keys.
Certificates
A different approach to managing users and their keys is to involve full-blown certificates. That is, each key can be certified by a pre-set Certification Authority (CA, most likely a private one), and the SSH server can be configured to only accept keys that have corresponding certificates. The solution can also accommodate certificate revocations for keys that should no longer be allowed.
In such a scenario one does not maintain files to list authorized keys any more; by definition the ones that have valid certificates are allowed, then ones that don't are not. The real benefit for this manifests when there's a need to enable/disable SSH access to users (and their keys) on multiple machines, such as in a corporate environment or when access should be managed to many servers at the same time. Using certificates in this scenario means the administrators no longer have to configure the servers separately, the CA can do this centrally.
ChrootDirectory
So far, unless you're using ForceCommand, granting a user access to a server via SSH is pretty much an all-or-nothing offer: once a user logged in they have a local shell (there'a reason why it's a secure shell after all) and can roam around on the server.
However, ChrootDirectory comes to the rescue. It provides a means to do an otherwise well-known chroot (jail) facility to limit what the user can do, which files they can access, on the server. It's tricky to set up but it's a highly effective measure. It's perhaps useful to use this in combination with port-forwarding prevention see (restrict and DisableForwarding)
An Interesting Use For SSH Tunnels
There's a service that's available online on my personal server. The service is implemented in Go on the same server. The nginx configuration for this is the following:
upstream my-service-prod {
    server localhost:8201;
    server localhost:8202;
}

upstream my-service-dev {
    server localhost:8301;
}

[...]

        location ~ ^/my-service-prod/ {
                proxy_pass http://my-service-prod;
                proxy_next_upstream_tries 0;
                proxy_set_header Host $host;
                proxy_set_header X-Real-IP $remote_addr;
                proxy_set_header X-Forwarded-For $proxy_add_x_forwarded_for;
                proxy_set_header X-Forwarded-Proto $scheme;
                proxy_http_version 1.1;
                proxy_set_header Connection "";
        }

        location ~ ^/my-service-dev/ {
                proxy_pass http://my-service-dev;
                proxy_next_upstream_tries 0;
                proxy_set_header Host $host;
                proxy_set_header X-Real-IP $remote_addr;
                proxy_set_header X-Forwarded-For $proxy_add_x_forwarded_for;
                proxy_set_header X-Forwarded-Proto $scheme;
                proxy_http_version 1.1;
                proxy_set_header Connection "";
        }

[...]
The important points about the above config snippet are:
- The service is visibly available at URL
/my-service-prod/. The actual back-end is a HTTP service (on two local ports, so that is't possible to restart it with 0 downtime - perhaps another blog post later...) - There is a development version of the same service, on a different URL (
/my-service-dev/), backed by a different local port. This is not redundant - but it's development so that's ok.
In reality, the server only really serves the back-en on ports 8201 and 8202. So, the production version. The development version is not available all the time. Except... when I log on with SSH. When I do I use:
ssh -L8301:localhost:8301 my-server
When I do this, the development URL comes alive, meaning whenever requests come to the URL /my-service-dev/, it ends up on my client port :8301... which is running, well, nothing usually. Except then I run Visual Studio Code and it's running my code in development binding to port.... you guessed it, localhost:8301.
The end result is, by using SSH reverse port forwarding, I bring alive an API on a public web server, that is in fact served by an IDE I run locally. I can develop all I want, debug it all I want, and it still looks like a public service - but only when I want it. Pretty cool!
Conclusion And Further Steps
SSH can do quite a lot for you. The above is just the tip of the iceberg, there are a lot more cool features you can learn about if you browse through the documentation of ssh and sshd and the related pages ssh_config and sshd_config. Just be careful when you experiment: if SSH is the only way for you to reach a server and you mess up the configuration, you can lock yourself out for good! But if you manage to avoid that, SSH can open up some previously unknown doors for you.
© Kistel